Easy DIY Floating Shelves
Floating shelves are an amazing addition to almost any space because they provide both storage and added décor. They can also be installed practically anywhere, because they don’t take up any floor space! No matter how big or small your home is, there is a room that could benefit from this simple DIY project.
Project Overview:


Note: The time-commitment, cost, and materials represents building two 48-inch wide floating shelves. This tutorial is only meant to act as a guide and may vary based on individual skill level.
Materials:
How to Build Floating Shelves:
1 Find Your Studs
Using a measuring tape, measure the width of your space where you want your shelves to hang. For our space, we measured a width of 48 inches.
Use a stud finder to find your studs and mark them with an X. Then, using a level, draw a straight line across the width of the space. Repeat this process for each shelf you are building.
2 Create Cleats to Brace Your Shelves
Grab your 2" x 2" studs and cut them the width you measured in the first step, making sure you have 2 pieces that are the same size. Then, cut 3 or 4 pieces to the depth that you want your shelves to be – these pieces will act as braces for your shelves to ensure they are secure. We cut our studs to be 8 inches long, and we cut 6 pieces so that we would have 3 pieces per shelf. You can also use more than 3 braces if your shelves are wider.
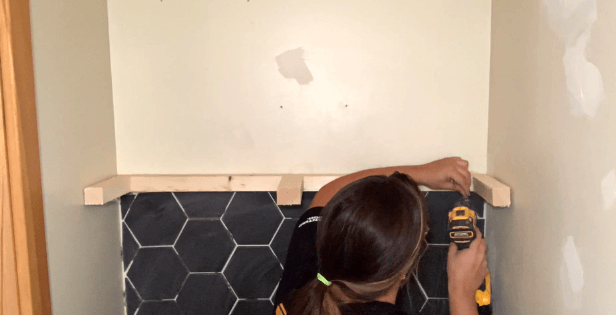
Now you are going to attach your brace pieces to the 2 longer pieces you just cut. Using construction grade adhesive and wood screws, attach two pieces to the ends and one piece in the middle.
What you just created is called a cleat, which will attach to the studs in your wall – this will act as the main support beam for your floating shelves to ensure they are secure.
Place your newly built cleat on the lines that you marked earlier, and be sure to use a level to make sure it’s straight. Screw it into where you marked your studs, which will ensure your shelf is secure. Repeat this process with all of your shelves.


3 Attach The Shell of Your Shelf
Once your cleats are installed, cut your 1" x 10" pine boards to the width of your shelves. In our case, we cut our boards to be 48 inches long. You’ll want to cut 2 boards per shelf that you are installing – these will cover both the top and bottom of the cleat you created. Use some adhesive and pin nails to attach the boards to the tops and bottoms of the cleat.
Now you are going to want to measure the new height of your shelves to create a piece for the front. Using that measurement, rip down your 1" x 4" boards to the length and width you need. Using adhesive and pin nails, attach the board to the front of your shelf. Repeat this process for all of your shelves.
You can fill your pin nail holes with wood filler to cover them, or you can leave them untouched for a more rustic look!
4 Finishing Touches
Apply some wood stain to your shelves to really bring the entire look together. Now your floating shelves are done!
You can use a variety of décor pieces to display on your shelves, like this plant that drapes over the side and gives a great pop of colour. Your shelves can also be functional and hold important things like toilet paper or laundry detergent, while still being a decorative statement piece!


